The Device Detail Page
The device detail page is the main workspace for one device. Click Details on any row in the Devices list to open it. Layout differs slightly by device type (doors have a Camera panel, WiFi APs have a Quick Actions block, etc.) but the overall structure is consistent.
Page Overview
+-------------------------------------------------------------+ | Devices / Door 9728 | ← breadcrumb +-------------------------------------------------------------+ | 🚪 Door 9728 [Remove device] | ← header | DOOR ● Online | +----------------------------------------+--------------------+ | | SETTINGS | ← right sidebar | LIVE STATUS | Friendly Name | | ● ONLINE | Criticality Tier | | | Device enabled | | CAMERA (doors with paired cameras) | Operator Notes | | [Take Snapshot] Auto-refresh: OFF | | | | ADAPTER IDENTITY | | GROUP | Adapter Device ID | | | Onboarded date | | DEVICE PAIRINGS | Device type | | | API source | | CAPABILITIES | Gateway | | Access methods | | | External actions | CONTROLLER HARDWARE| | UI Template | Controller name | | Features (read-only) | Model | | | MAC | | UI PREVIEW | Controller ID | | | | | ZENEDGE INTEGRATION | | | | | | RECENT ACTIVITY | | +----------------------------------------+--------------------+
Each panel can be collapsed with the ▼ Hide chevron on its title bar.
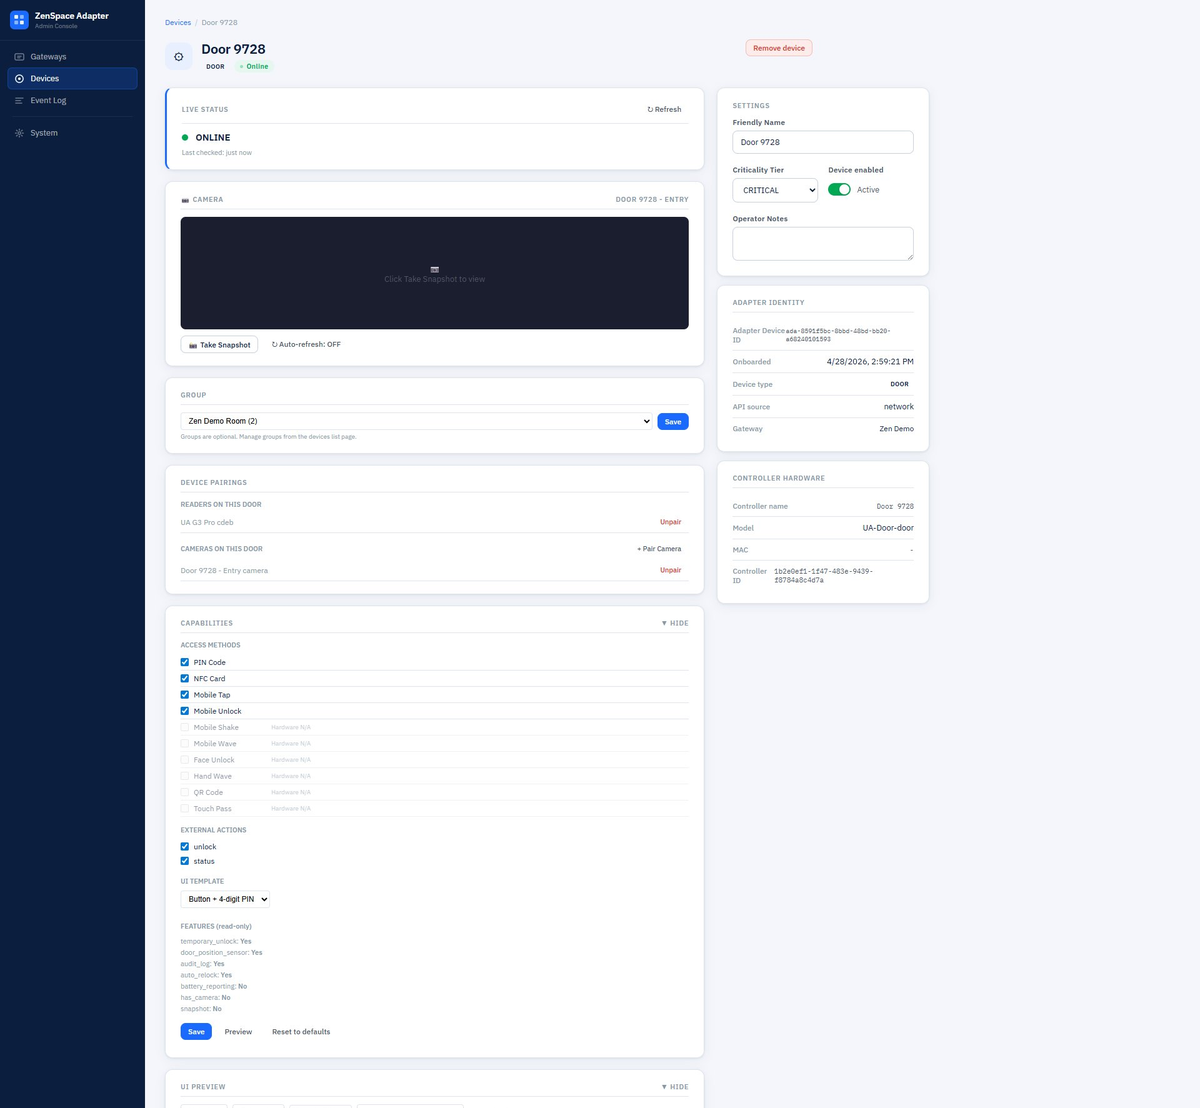
Figure 8a — Door 9728 detail page (top): header, Live Status, Camera, Group, Device Pairings, Capabilities. Right sidebar: Settings, Adapter Identity, Controller Hardware
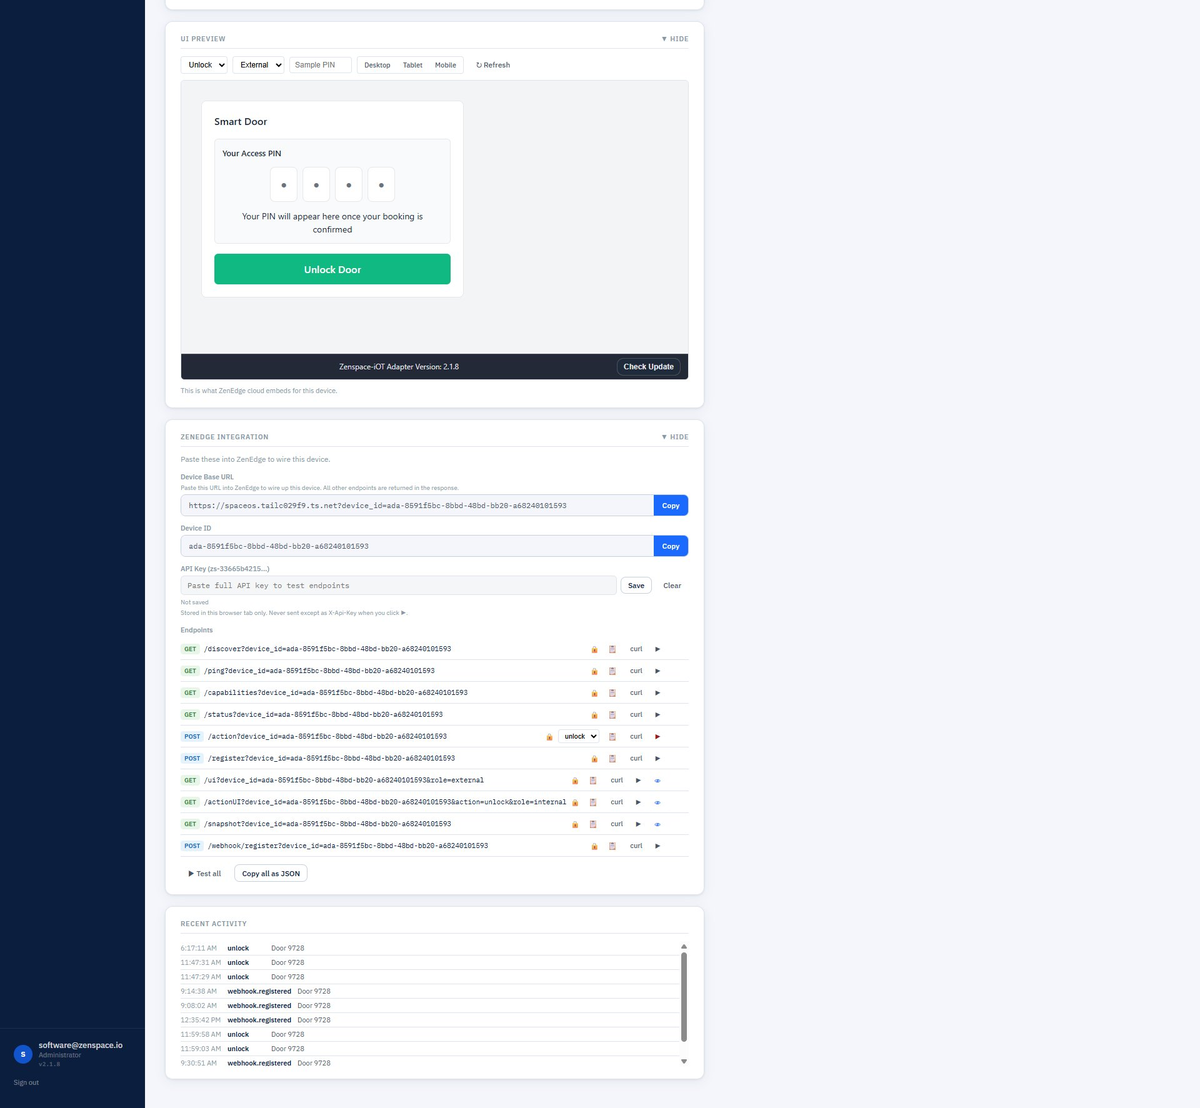
Figure 8b — Door 9728 detail page (bottom): UI Preview, ZenEdge Integration, Recent Activity
Header Bar
Top of the page shows:
- Type icon and friendly name (e.g., 🚪 Door 9728)
- Type badge: DOOR, READER, WIFI, CAMERA, SWITCH, ROUTER
- Live status dot: ● Online / ● Offline
- Remove device button (top right) — destructive, removes the device and invalidates its ada- ID
Settings (Right Sidebar)
The first sidebar panel is Settings — these are values you can edit and save:
Edits save when you leave the field or click Save (if a Save button is shown).
Adapter Identity (Right Sidebar)
Read-only block showing identifiers the adapter assigned at onboarding:
Controller Hardware (Right Sidebar)
Read-only block showing UniFi-side identifiers, useful for cross-referencing with the UniFi console:
Live Status
Panel at the top of the main column. Shows current state with a ↻ Refresh button:
- Online indicator with timestamp (“Last checked: just now”)
- For doors: lock state (LOCKED / UNLOCKED), door position (CLOSED / OPEN / sensor N/A)
- For WiFi APs: channel and connected client count
- For cameras: just online state (snapshot panel handles imagery)
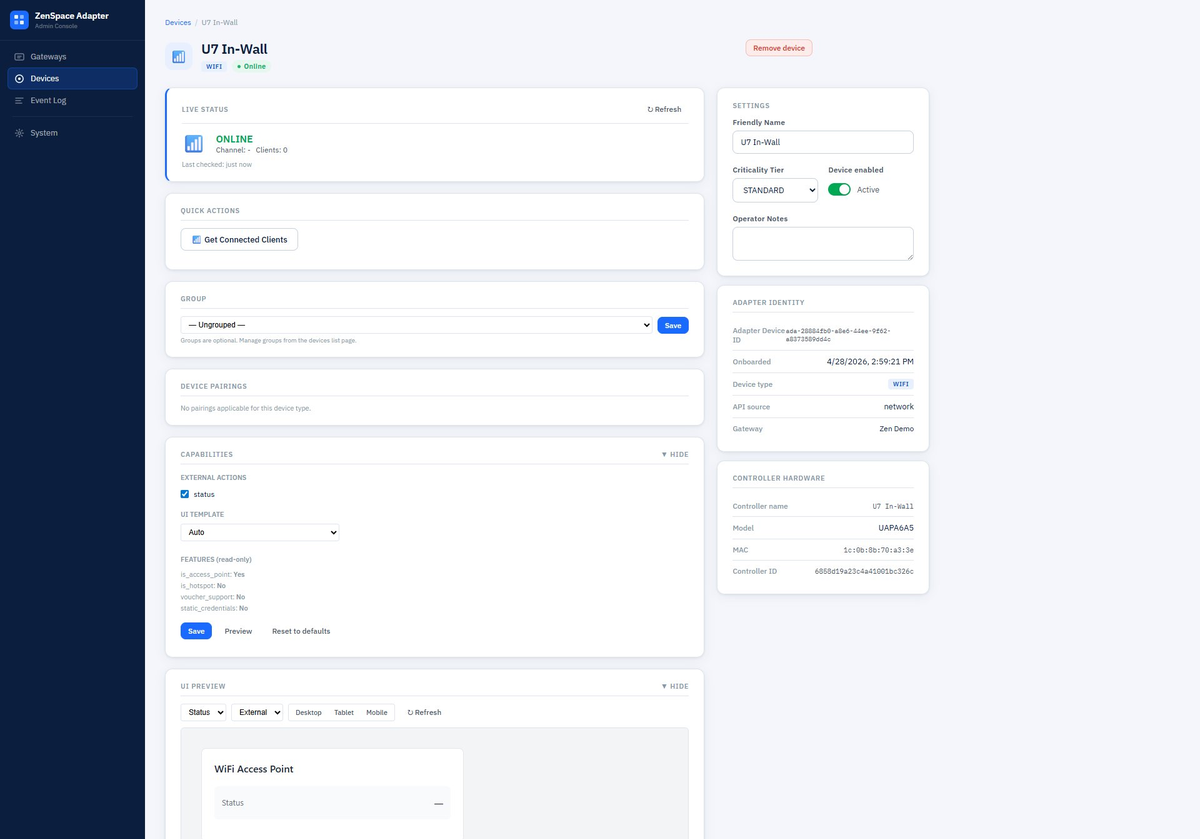
Figure 9a — U7 In-Wall WiFi detail page (top): Live Status, Quick Actions, Group, Capabilities

Figure 9b — U7 In-Wall WiFi detail page (bottom): UI Preview, ZenEdge Integration
The adapter polls UniFi based on this device’s api_source. If the device is offline, this panel greys out the values and shows a red banner explaining the device is unreachable.
Camera Panel (doors with paired cameras, and standalone cameras)
This panel appears only when there’s a camera in scope (a paired Protect camera on a door, or the device itself is a camera).
- Take Snapshot button — manually grabs a fresh JPEG from UniFi Protect
- Auto-refresh: OFF / ON toggle — when ON, takes a new snapshot at a regular interval
- A large display area below shows the snapshot. Before you click Take Snapshot, the area is empty/blank — the panel does not show a live feed automatically.
Snapshots are streamed directly from UniFi Protect to your browser via the adapter (which proxies the call); the adapter does not store the JPEGs.
Figure 10a — AI Theta camera detail page (top): Live Status, Camera panel, Group, Device Pairings (Paired Door section), Capabilities
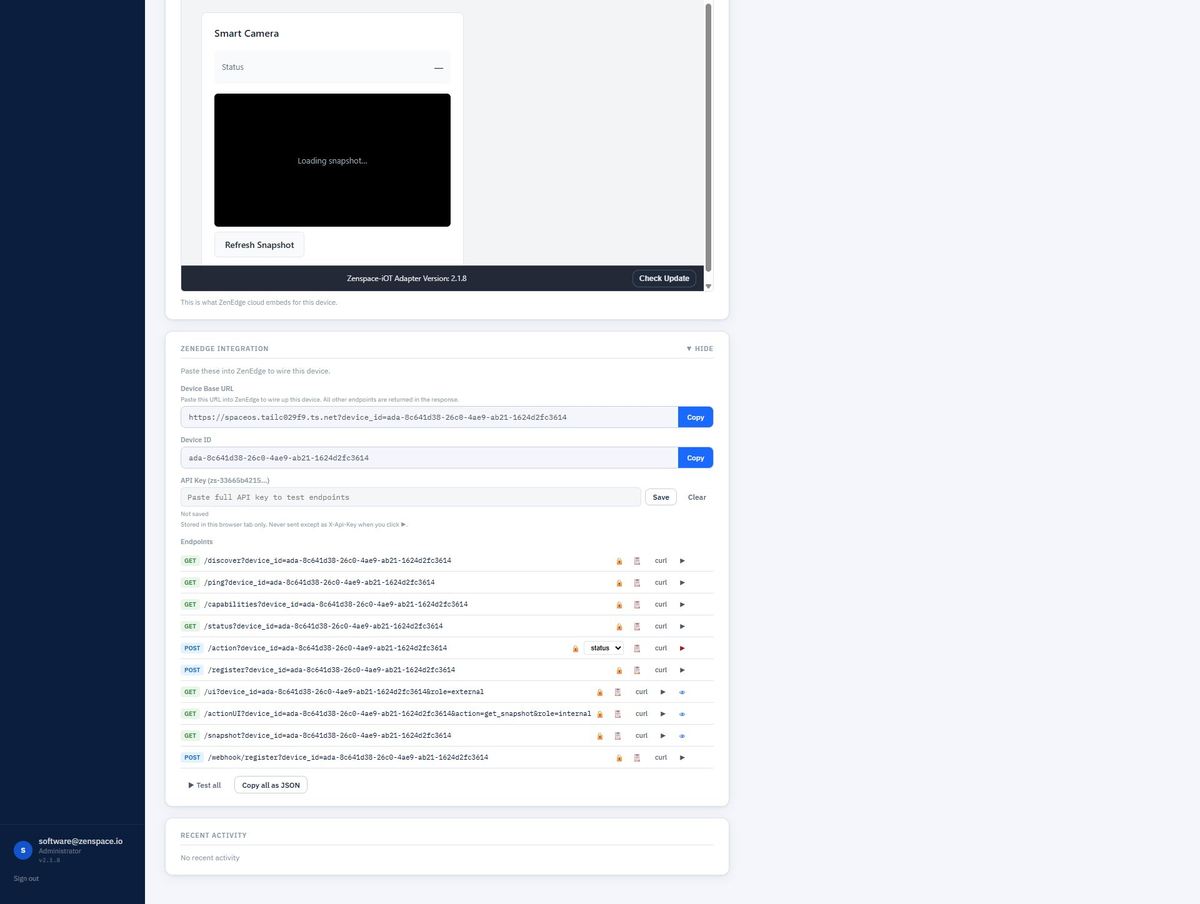
Figure 10b — AI Theta camera detail page (bottom): UI Preview, ZenEdge Integration
Internally the adapter calls Protect’s Integration API (/proxy/protect/integration/v1/cameras/{id}/snapshot) — never the internal Protect API, which requires session login and won’t work with API keys.
Group Assignment
Dropdown to assign this device to a group, with a Save button. Groups are optional and can be created from the Devices page (the Manage Groups button in the toolbar).
The dropdown shows existing groups plus “— Ungrouped —” to remove the device from any group. Examples of useful groups:
- Lobby Access — front door + reader + lobby camera
- Room 101 Entry — door + paired camera
- Floor 2 APs — all WiFi APs on floor 2
Below the dropdown a hint reads “Groups are optional. Manage groups from the devices list page.”
Device Pairings (doors and cameras)
Shows logical relationships between devices that work together as a unit.
For a door, this panel displays:
- READERS ON THIS DOOR — paired readers (e.g., UA G3 Pro cdeb) with an Unpair link per row
- CAMERAS ON THIS DOOR — paired cameras (e.g., Door 9728 - Entry camera) with an Unpair link per row and a + Pair Camera link to add more
For a camera, the panel shows:
- PAIRED DOOR — door this camera is paired to, or “Not paired. Snapshot auto-inference may still work by MAC/name.”
About auto-inference: even if a camera isn’t explicitly paired, the adapter will try to find one by MAC or name matching when a door requests a snapshot. Explicit pairing is more reliable.
For WiFi APs, switches, and routers, this panel shows “No pairings applicable for this device type.”
Recent Activity
A scrolling list at the bottom of the page showing recent events scoped to this device — unlock attempts, status checks, webhook deliveries, configuration changes. Each row shows:
- Timestamp
- Event topic (unlock, webhook.registered, etc.)
- Device name
- Optional payload preview
Click into the Event Log in the left navigation to see the same data with full filtering.