System Administration
Click System in the left navigation. The system page is a single long-scrolling page with five sections, each covering a different administrative concern.
The page header reads “System — Adapter info, software updates, and environment.” The sections, in order down the page:
- Adapter Info — version, uptime, basic counts
- Adapter API Keys — keys ZenEdge cloud uses to authenticate
- Software Update — OTA channel, current version, update status
- Hardware Diagnostics — read-only health checks on every device
- Environment — Public URL and Host
Adapter Info
The first panel on the System page is a read-only summary:
This panel is useful for a quick health glance and for support tickets — most support questions start with “what version are you on?”

Figure 16 — System page top: Adapter Info panel with version, protocol, uptime, gateway/device counts
Adapter API Keys
The Adapter API Keys panel below Adapter Info is where you manage authentication for cloud-to-adapter calls.
The intro line reads:
Authenticate ZenEdge to this adapter. Keys are hashed — plaintext shown only once at creation.
Why these keys exist
The adapter API key is what ZenEdge cloud uses to authenticate to the adapter’s contract endpoints (/ping, /action, /ui, etc.). It’s completely separate from the UniFi credentials you store on a gateway:
- UniFi credentials let the adapter talk to UniFi
- Adapter API keys let ZenEdge cloud talk to the adapter
- Either can be rotated without touching the other
This separation matters for security. A leaked UniFi key compromises UniFi access but not the cloud-to-adapter flow. A leaked adapter API key compromises the cloud-to-adapter flow but not your UniFi controller.
Existing keys
Each existing key shows as a card with:
- Key prefix — first ~12 characters in the format zs-XXXXXXXXX... (the full value is never shown after creation)
- Label — the friendly name you set at creation (e.g., Dev Adapter Key, Production, Backup)
- Active badge (green) if the key is usable; greyed out if revoked
- Created timestamp and the email of the admin who created it
- Last used timestamp showing when the key was last accepted
- Revoke and Delete buttons
Generating a new key
Click + Generate New Key. A modal opens titled Generate New API Key with one optional field:
- Label (optional) — placeholder “e.g. Production, Backup, Dev”. Free-text label to identify the key later.
Click Generate. The modal shows the full key value once — copy it now to your destination (ZenEdge cloud config, password manager, etc.).
Critical: the full key can be copied only at creation time. After you close the modal, only the prefix is visible. If you lose the full value, you’ll have to revoke the key and generate a new one.
The key has the format zs- followed by random hex. The adapter stores only a hash of the key; the plaintext is never persisted.
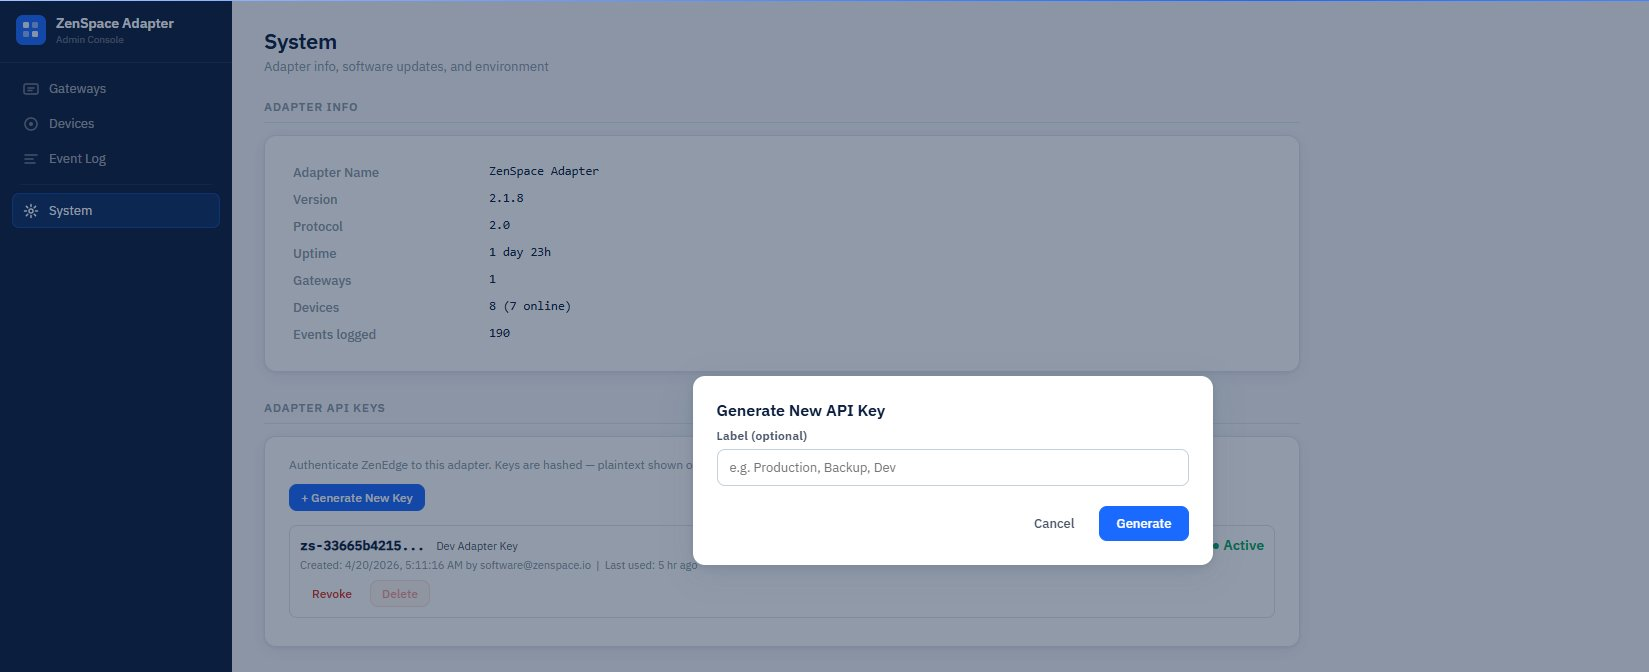
Figure 17 — Generate New API Key modal with an existing key showing prefix, label, creation timestamp, last-used, Revoke and Delete buttons
Revoking a key
Click Revoke next to any key. The key is marked inactive — any further calls authenticated with it return 401. The key is preserved in the list (with greyed-out badge) so you can see when it was revoked and by whom.
Use Revoke when you suspect a key is leaked, or as part of a routine rotation.
Deleting a key
Click Delete to remove a revoked key from the list entirely. Some installations distinguish “revoke” (keep the audit record) from “delete” (purge the record). Use Delete only when you no longer need the audit trail for that key.
When a key is deleted, the event log records adapter_api_key.deleted with the prefix — so a trail of “this prefix existed and was removed” persists even after the key card disappears from the System page.
Rotation workflow
Best practice is rotation every 90 days:
-
- Generate New Key with a clear label like Production 2026-Q3
- Update ZenEdge cloud configuration to use the new key
- Watch the Last used timestamp on the old key — when it stops advancing, the cloud is confirmed using the new key
- Click Revoke on the old key
Last-active-key protection
If you try to revoke the only remaining active key, the adapter refuses with 409 LAST_ACTIVE_KEY. This prevents you from accidentally locking ZenEdge cloud out.
To rotate the last key safely: generate a new one first, confirm the cloud has switched to it, then revoke the old one.
Emergency fallback
If you somehow lock yourself out completely (all keys revoked, cloud can’t reach the adapter), the ADAPTER_API_KEY value in the Pi’s .env.production.conf works as an emergency fallback. The adapter logs a loud warning whenever this fallback key is used. SSH into the Pi, set the env var, restart the service, then create a real key on the System page and remove the fallback.
Software Update
The Software Update panel manages OTA (over-the-air) updates from the ZenSpace update server.
Current state
The panel shows:
Check for Update
A Check for Update button forces an immediate poll against the update channel. Useful when you’ve just published a new release and want to pull it down without waiting for the scheduled check.
Automatic updates
The adapter checks for updates on a schedule and applies them automatically when a newer version is available on the configured channel. You don’t have to click anything to receive updates — they roll out as released.
This means the production fleet stays current with minimal operator intervention. If you want to delay updates for a specific Pi (for example, while debugging a customer issue), the simplest path is to switch that Pi’s channel to one that doesn’t have new releases queued.
Channels
The channel is read from the IOT_ADAPTER_UPDATE_CHANNEL env var in /home/zencam/Zenspace-iOT/.env.production.conf.
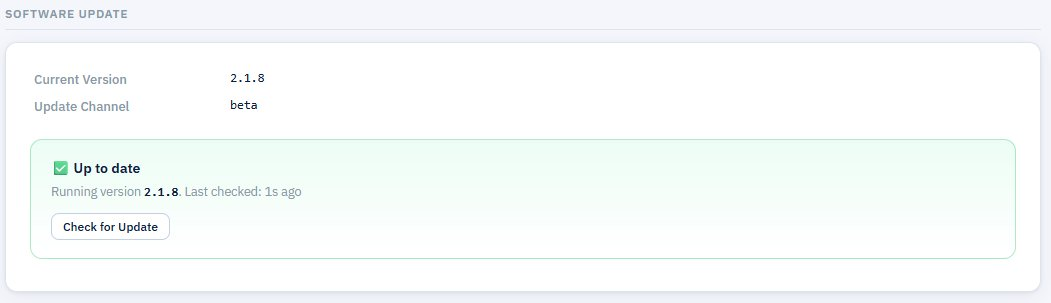
Figure 18 — Software Update panel: current version 2.1.8 on beta channel, Up to date status, Check for Update button
Switching channels
To move a Pi between channels:
- SSH in to the Pi.
- Edit /home/zencam/Zenspace-iOT/.env.production.conf.
- Change IOT_ADAPTER_UPDATE_CHANNEL=stable to IOT_ADAPTER_UPDATE_CHANNEL=beta (or vice versa).
- Restart the adapter: sudo systemctl restart zenspace-iot.service.
- Click Check for Update on the System page (or wait for the next scheduled check).
The next update check pulls from the new channel.
What happens during an update
Under the hood, when a new version is detected:
- The adapter downloads the signed tarball
- Verifies the manifest signature and SHA-256 checksum
- Extracts to releases/
<new-version>/ - Runs database migrations
- Switches the current symlink to the new release
- Restarts the adapter service
During the restart, the browser loses connection for 30–60 seconds. Refresh once the UI is back.
Automatic rollback
If an update goes wrong — startup fails, health checks don’t pass, or the service crashes during initialization — the adapter automatically rolls back to the previous version. You don’t have to do anything; the systemd unit handles this.
When a rollback happens:
- The current symlink is restored to the prior release directory
- The adapter service is restarted on the old version
- An entry is written to the event log explaining the rollback
This means a bad release rarely takes a Pi offline for long. The worst case is one failed update cycle plus a few minutes of downtime.
Version retention
The adapter keeps 3 previous versions on disk in releases/<version>/ directories. When a 4th version is installed, the oldest one is automatically removed. This bounds disk usage while keeping enough history for rollback scenarios.
If you ever need to manually roll back further than the automatic rollback allows, the available versions are:
ssh zencam@<pi-ip>
ls /home/zencam/Zenspace-iOT/releases/
You’ll see up to four directories (current + 3 previous). To switch:
cd /home/zencam/Zenspace-iOT
ln -sfn releases/<old-ver> current
sudo systemctl restart zenspace-iot.service
Version comparison rules
The OTA agent compares semver strings strictly. Pre-release versions are less than their stable equivalents:
2.1.0-beta.93 < 2.1.5 < 2.1.6 < 2.1.8 < 2.2.0-beta.1 < 2.2.0
The agent does not allow downgrades. If your Pi is on 2.1.8 and the channel publishes 2.1.0-beta.99, the update is rejected with “No update (or downgrade not allowed).”
This prevents accidental downgrades when switching channels. The automatic-rollback mechanism uses local files, not channel downgrades, so this rule doesn’t interfere with rollback.
Hardware Diagnostics
The Hardware Diagnostics panel runs read-only health checks on every enabled device. The intro line reads:
Run read-only health checks on every enabled device. Takes up to 60 seconds. No state changes.
Running diagnostics
Click Run Diagnostics. The adapter walks through every enabled device (those with the green toggle ON in the Devices list) and runs four checks against each one. Total runtime is typically 1–60 seconds depending on how many devices you have.
Below the button, the panel shows:
- Duration — total runtime of the most recent run (e.g., 3.0s)
- Gateway grouping — results grouped under each gateway (e.g., Zen Demo)
- Per-device table with check results
Per-device check table
The four checks
Each check returns one of three states:
- pass (green pill) — the check succeeded
- fail (red pill) — the check failed (the row stays so you can see exactly which check)
- skip (grey pill) — the check doesn’t apply to this device type (e.g., snapshot on a switch)
Reading results
A typical run shows mostly green pass pills. When something fails — like the AI Theta camera showing snapshot: fail in the example below — the row pinpoints exactly which capability is broken:
AI Theta camera status:skip capabilities:pass ui_render:pass snapshot:fail Door 9728 door status:pass capabilities:pass ui_render:pass snapshot:pass Door 9728 - Entry camera status:skip capabilities:pass ui_render:pass snapshot:pass U7 In-Wall wifi status:pass capabilities:pass ui_render:pass UA G3 Pro cdeb reader status:pass capabilities:pass ui_render:pass USW Ultra 210W switch status:skip capabilities:pass Zen Demo router status:skip
This is enough to diagnose most issues without leaving the adapter UI. For example, a camera with snapshot: fail while everything else passes usually means the camera is offline in UniFi Protect or its Protect credentials are wrong.
When to run diagnostics
- After adding a new gateway or onboarding new devices — sanity-check everything works
- When ZenEdge cloud reports problems with a specific device
- Periodically as part of operations review
- Before declaring a Pi production-ready for mass rollout
The check is read-only and safe to run any time — it does not change device state, unlock doors, or modify configuration.
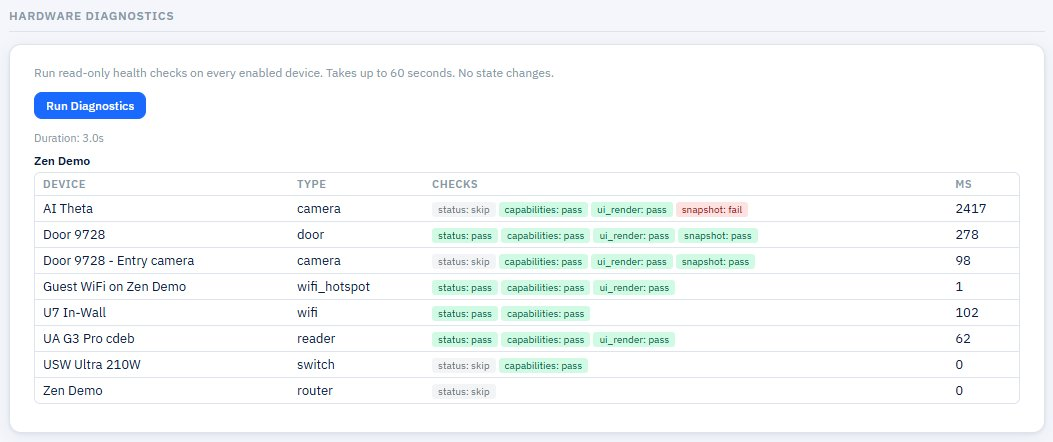
Figure 19 — Hardware Diagnostics: per-device check table showing status / capabilities / ui_render / snapshot with pass/fail/skip per device (AI Theta camera snapshot failing)
Environment
The last panel on the System page shows network-level information about how the adapter is reachable:
These values come from ADAPTER_PUBLIC_URL in the env config. They’re informational — useful when configuring ZenEdge cloud to point at this Pi, or for support tickets that need the adapter’s address.

Figure 20 — Environment panel showing the Public URL and Host
Maintenance Tasks (SSH-side)
A few common operations that don’t have a UI on the System page but are worth knowing.
Restarting the service
sudo systemctl restart zenspace-iot.service
Tailing logs
Adapter service
sudo journalctl -u zenspace-iot.service -f
Update service
sudo journalctl -u zenspace-iot-update.service -n 200
First-boot service (only useful right after deployment)
sudo journalctl -u zenedge-firstboot.service -n 200
Database backup
The SQLite database is at /home/zencam/Zenspace-iOT/data/zenspace.db. To back it up safely:
cd /home/zencam/Zenspace-iOT/data sqlite3 zenspace.db ".backup zenspace-backup-$(date +%Y%m%d).db"
This creates a consistent snapshot even with the service running.