Gateway Setup
What a Gateway Is
In the adapter, a “gateway” represents one UniFi controller. Most facilities have a single UniFi controller managing all their UniFi hardware, so most adapter installations have one gateway.
A single gateway entry can manage all three UniFi applications:
You add a single gateway entry with both auth header rows, and the adapter automatically picks the right port and header for each device based on its inferred type.
Adding a Gateway
- Sign in to the adapter UI.
- Click Gateways in the left navigation.
- Click + Add Gateway at the top right.
A side panel opens with the Add Gateway form titled “Connect an IoT controller — connection verified before saving.” Fill it in as follows.
Gateway Name
A friendly label that identifies this controller. Example: HQ Building A — Floor 2. This is what shows up in the gateway list, event log, and diagnostics — make it readable.
Connection
Auth headers
A note at the top of this section reads “All values are encrypted with AES-256-GCM. Add the auth headers your controller requires.” Below it, you’ll see one row to start with:
To add a second header for UniFi Access, click + Add auth header below the first row. A second row appears. Set:
Use the eye icon (👁) on the right of each row to toggle visibility while typing. Stored values are always encrypted on disk.
One or both? If you only have UniFi Access devices and no APs/switches, just X-API-KEY isn’t enough — you need the Authorization: Bearer header. If you only have UniFi Network devices, X-API-KEY alone is fine. Most sites have both UniFi applications and need both headers.
Optional
Skip TLS certificate verification
A toggle at the bottom of the form labelled Skip TLS certificate verification with the caption “For self-signed certificates.”
Most UniFi controllers ship with self-signed certificates by default, which is why this toggle exists. When ON, the adapter accepts the controller’s certificate without verifying it against a trusted CA.
Security note: Leaving this toggle ON disables a security check that protects against man-in-the-middle attacks on the local network. The safer practice is:
- First try OFF. Click Test & Save. If the connection succeeds, your controller has a properly signed certificate — leave the toggle OFF.
- If the test fails with a TLS error, your controller uses a self-signed certificate — turn the toggle ON, then save.
Many sites can leave this OFF safely if their UniFi controller is fronted by a reverse proxy with a real certificate.
Test & Save
Click Test & Save at the bottom. The adapter:
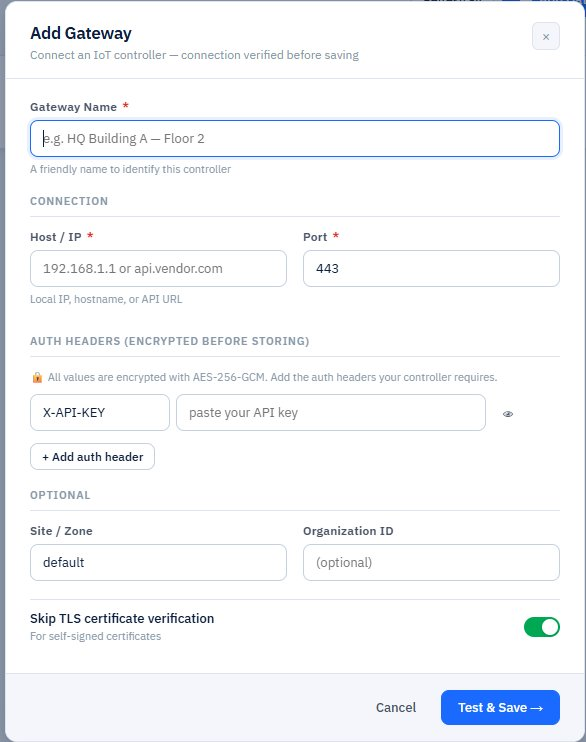
Figure 2 — Add Gateway form: dynamic auth headers, optional Site/Zone and Organization ID, Skip TLS toggle
- Attempts to reach the controller using the host, port, and headers you provided
- If unreachable or authentication fails, shows a specific error and does not save — fix and retry
- If the test succeeds, encrypts the credentials with AES-256-GCM, stores them, and the gateway appears in the list with status Online
This “test before save” behavior is why misconfigured gateways rarely make it into the list — bad credentials are caught before they’re persisted.
The Gateway Card
Once added, your gateway appears as a card in the Gateways list. The card shows everything you need at a glance:
- Name — the friendly label you set
- Host:port — controller address
- Health indicator — a small activity-pulse icon next to the status (covered below in “Run Discovery Diagnostic”)
- Status badge — green Online or red Offline
- Auth header pills — small badges showing which auth headers are configured (e.g., X-API-KEY, Authorization)
- DEVICES count — how many devices are onboarded from this gateway
- Three action buttons — Discover, Ping, Delete
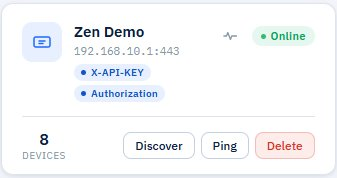
Figure 3 — Close-up of a gateway card showing the activity icon (Run discovery diagnostic), status badge, auth header pills, and action buttons
Above the gateway cards, the page shows four summary cards: total Gateways, Online, Devices onboarded, and Offline Gateways.

Figure 1 — The Gateways page with summary cards and one online gateway
Pinging a Gateway
Click Ping on the gateway card. The adapter makes a quick test call to the controller and returns one of:
- Gateway is online — a green toast appears at the top right. The controller is reachable and credentials are valid.
- Unreachable — a red toast with the specific error. Could be a network issue, expired credentials, or wrong host.
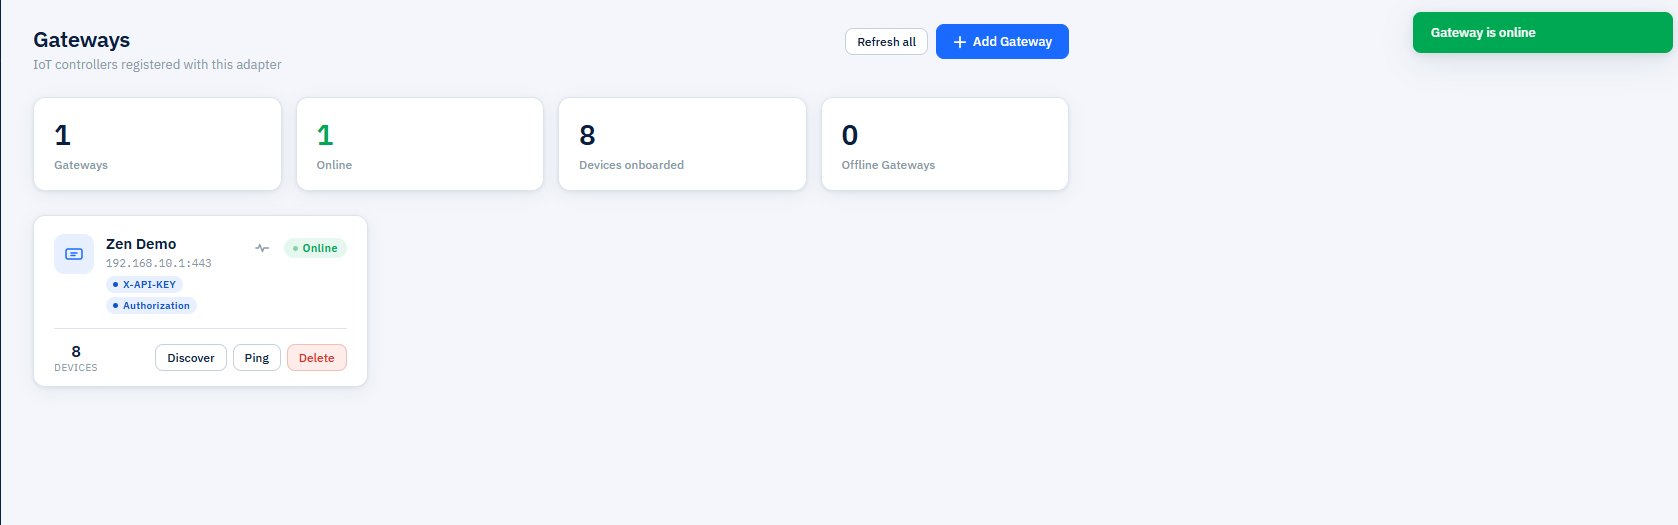
Figure 4 — Ping result: green ‘Gateway is online’ toast
If ping fails:
- From an SSH session on the Pi, run ping
<controller-ip>to confirm basic network reachability. - Open the controller’s web UI from the Pi’s network — confirm it’s accessible.
- Re-check the API keys for typos and trailing whitespace.
- Confirm the Network API key was issued from the correct location (Network → Control Plane → Integration, not Site Manager).
- Check the Event Log in the adapter UI for the specific error.
Run Discovery Diagnostic
Next to the Online status badge on the gateway card, you’ll see a small activity-pulse icon. Hover over it to see the tooltip “Run discovery diagnostic”.
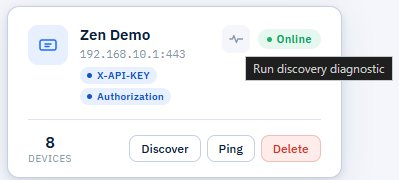
Figure 5 — Hovering the activity-pulse icon shows the ‘Run discovery diagnostic’ tooltip
Clicking this runs a deeper health check than a simple ping. Where Ping just confirms basic reachability, the discovery diagnostic verifies that the adapter can actually call the UniFi APIs it needs to onboard and manage devices.
The diagnostic checks whether the gateway can reach UniFi APIs and reports specific errors. It’s the right tool when:
- You added the gateway, ping succeeds, but discovery returns no devices — the basic connection works but an API endpoint or scope is missing
- Devices on the gateway are showing inconsistent statuses
- You’ve changed UniFi controller version or credentials and want to verify everything still works
When the diagnostic finds an issue, the error message points to the specific failure (e.g., “Network API returned 403 — check API key scope” or “Access API timeout — port 12445 may be blocked”). This is much more useful than a generic “ping failed.”
Difference vs Hardware Diagnostics on the System page (Part 9.4): the gateway card’s diagnostic is a quick, gateway-scoped check that verifies the adapter can talk to each UniFi API. The Hardware Diagnostics panel on the System page runs a broader battery of checks across every onboarded device — covering status, capabilities, UI render, and snapshot.
Editing or Deleting a Gateway
To change credentials or settings:
- Go to Gateways.
- Click the gateway row.
- Click Edit.
- Update fields as needed and click Save.
If you change credentials, all subsequent device commands use the new values immediately. The next health probe (within 2 minutes) confirms the change works.
To delete a gateway:
- Go to Gateways → click the gateway row.
- Click Delete.
- Confirm the dialog.
Cascade behavior: Deleting a gateway also deletes all devices that were onboarded from it. The cloud’s ada- device IDs become permanently invalid. If you re-add the gateway and re-onboard the same physical devices, they’ll get new ada- IDs — the cloud will treat them as different devices. Only delete a gateway if you’re decommissioning the site or doing a full reset.