Device Lifecycle
Discovering Devices
Discovery is launched directly from the gateway card.
- From the Gateways page, find your gateway card.
- Click Discover on the card.
- A breadcrumb at the top changes to Gateways /
<Gateway Name>/ Discover Devices and the discovery page loads.
The adapter calls the controller’s APIs and merges the results into a single list. Behind the scenes:
Step 1 GET /api/s/{site}/stat/device (Network API, port 443)
→ Switches, access points, routers
Step 2 GET /api/v1/developer/doors (Access API, port 12445) → Door locks with their lock state and door position
Step 3 GET /api/v1/developer/devices (Access API, port 12445) → Readers and hubs (UA G3 Pro, UA-Lite, UA-Hub-Door, etc.)
Step 4 Merge and deduplicate → By MAC first, then by name. When a physical door appears in both the doors and devices lists, the doors entry wins.
Step 5 Infer type and criticality for each device, mark already-onboarded.
Discovery typically completes in 5–15 seconds depending on how many devices the controller manages.
Reading discovery results
The page header reads Discovered Devices with a summary line like “Zen Demo · 8 devices found · 0 already onboarded · 8 available.” Just below is the instruction banner: “Select devices to onboard and set a friendly name for each. Greyed rows are already onboarded.”
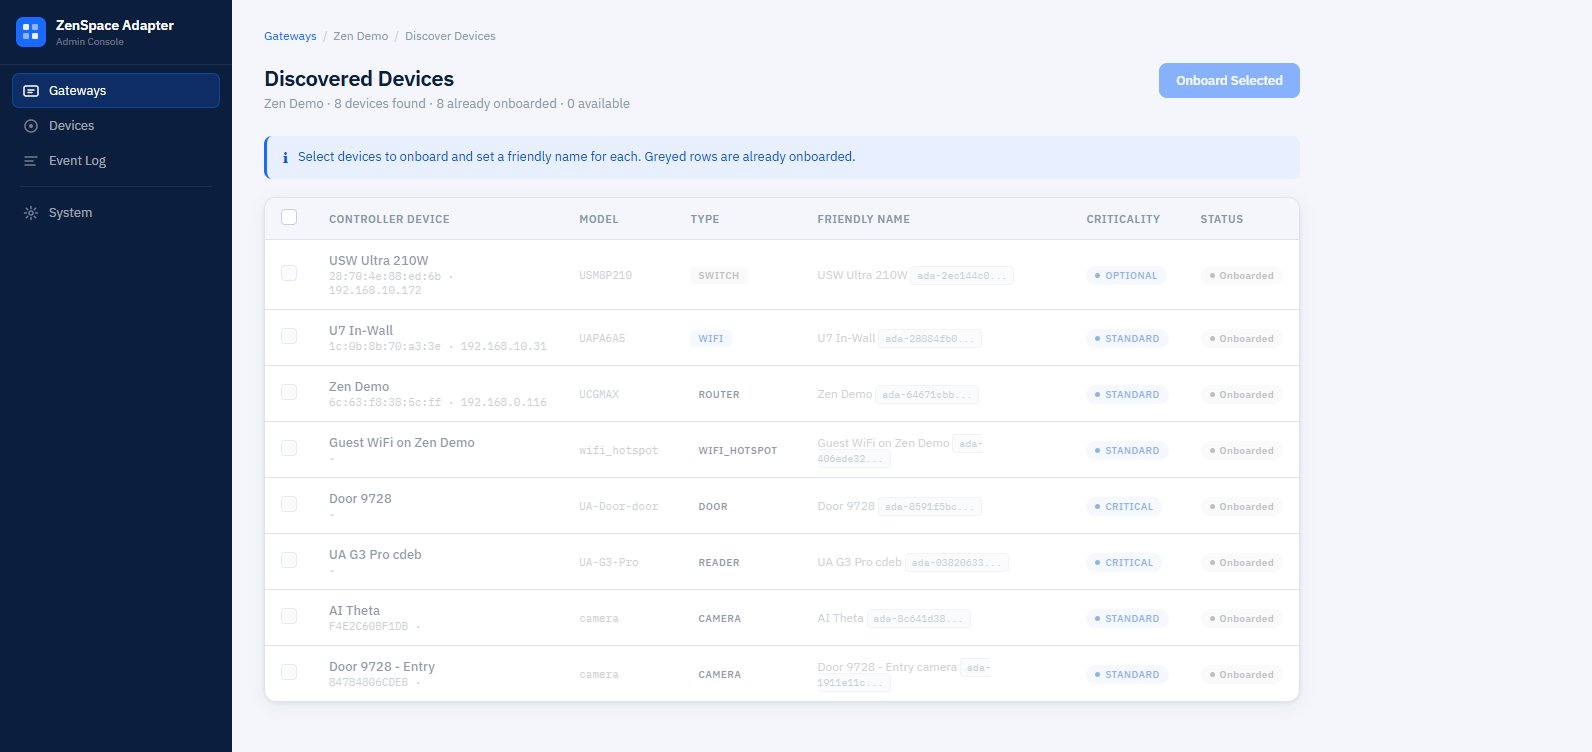
Figure 6 — Discovery results: selectable rows with editable Friendly Name and Criticality columns
The table has these columns:
Editing the friendly name
The friendly name is what shows up everywhere downstream — Devices list, device detail page, event log, and ZenEdge cloud. Default friendly names match the controller’s device name, but you should edit them to follow your own naming convention.
Examples of useful friendly names:
- Front Door — Lobby
- Floor 2 Reception AP
- Conference Room A Camera
Click the friendly name field on any row and type. The edit happens in place. Press Tab or click outside the field to save.
Adjusting criticality
Criticality determines how the adapter treats the device for health monitoring, alerting, and offline cascades. The default mapping is:
You can override per device — for example, a camera covering a high-security area might be set to CRITICAL even though cameras default to OPTIONAL. Click the criticality badge to cycle through the three values.
Why criticality matters: when a CRITICAL device goes offline, the adapter raises a high-priority event and the cloud may page operators. OPTIONAL devices generate informational events only. Set this thoughtfully — too many CRITICALs means alert fatigue, too few means real issues get missed.
Device type inference rules
The adapter applies prefix rules to infer type from the model string. Common examples:
WIFI_HOTSPOT is a logical device, not a physical one. It represents a WiFi network/SSID published by your controller (used for the voucher flow). It doesn’t have a MAC or IP — those columns will be empty on discovery rows for hotspot entries.
Re-running discovery
You can re-run discovery any time — when you add a new device to the UniFi controller, when you replace a hub, etc. The page summary updates to reflect new totals. Previously onboarded devices stay greyed.
Onboarding Devices
Discovery shows you what’s connected to the controller. Onboarding registers selected devices with the adapter so they can be managed locally and by ZenEdge cloud.
The recommended workflow:
- Review every device row in the discovery results
- For each one, edit the Friendly name to follow your naming convention
- Adjust Criticality if the default doesn’t fit
- Tick the checkbox on devices you actually want to manage (skip ones you don’t, like network switches you’d rather ignore)
- Click Onboard Selected at the top right
For each onboarded device, the adapter:
- Generates a stable adapter device ID in the form ada-
<uuid>— for example ada-81ecbded-6a6d-4c70-a78a-febf2fa65be8. This is the only identifier ZenEdge cloud will ever see for this device. - Locks in the device type based on the inference.
- Stores the friendly name you set.
- Stores the criticality you chose.
- Records the API source (network or access) so commands route to the right port.
- Stores UniFi-side identifiers (MAC, model, native UniFi ID) for future lookups.
Once onboarded, the device appears in the Devices page in the left navigation and is available for management — actions, status, capabilities, UI preview, all the rest.
About ada- IDs: These are stable. They survive UniFi device renames, IP changes, and even controller migrations (as long as you don’t delete the gateway). They’re how ZenEdge cloud refers to a device forever.
About type locking: Once onboarded, a device’s type is locked. To change a device’s type, delete the device and re-onboard it (which assigns a new ada- ID).
About skipping devices: You don’t have to onboard everything discovery finds. If you don’t want the adapter to manage your network switches, just don’t tick those rows. You can always come back and onboard them later by re-running discovery.
The Devices Page
Click Devices in the left navigation to see everything onboarded across all gateways. The page header reads “Devices — All onboarded devices across all gateways” with a Refresh All Status button at the top right.
Type filter pills
Just below the header, a row of pill buttons lets you narrow the list by type. The pills shown depend on what device types exist in your installation. Typical pills:
- All (default, highlighted blue)
- Door, Reader, Camera
- Guest WiFi, WiFi
- Switch, Router
Click any pill to filter the table to that type. Click All to clear.
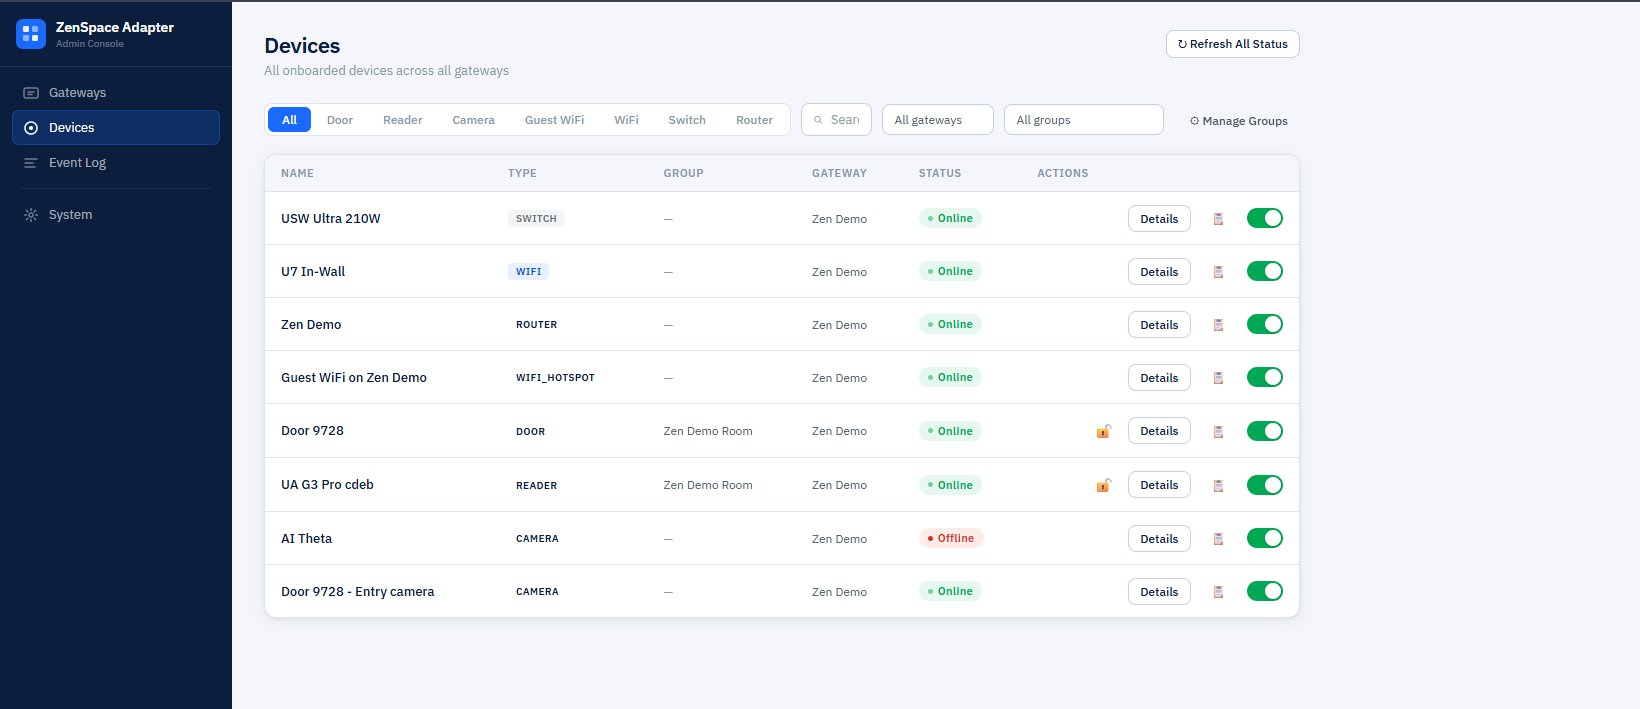
Figure 7 — Devices page: type filter pills, search, gateway/group dropdowns, and the device table
Additional filters
To the right of the pills you’ll find:
- Search box — free-text search by name, type, or ada- ID
- All gateways dropdown — narrow to one gateway (useful when you have multiple)
- All groups dropdown — narrow to devices in a specific group
- Manage Groups button — opens group management modal
Table columns
Each row of the device table shows:
Row actions
Three controls in the Actions column on every row:
- Quick-action icon (type-specific) — for doors and readers, an unlock padlock icon that triggers an immediate unlock. For cameras and other devices, this slot may be empty or show a different relevant icon.
- Details — opens the device detail page.
- Device enabled toggle (green/grey) — disables the device. When toggled off, the device stays onboarded but no API calls succeed against it — ZenEdge cloud requests return a “device disabled” error. Use this for maintenance or to temporarily decommission a device without losing its ada- ID. Same control as the toggle in the device detail page’s Settings panel.
Groups
Groups let you batch operations across multiple devices. A door at the lobby and a reader paired with it might both belong to “Lobby Access.” A door and its camera might be grouped as “Room 101 Entry.”
Groups are optional. To create or rename groups, click Manage Groups in the toolbar. To assign a device to a group, open its detail page and use the Group dropdown there.